How to install the CEA on Windows - part 1
Up until very recently, the official guide to installing the City Energy Analyst (CEA) on Windows involved a bunch of arcane steps that sometimes tripped up new (and experienced) users. So we set out to come up with a better solution:
There are two installation modes for the CEA, based on how you intend to use software:
- installation as a Student or Practitioner (this post)
- installation as a Researcher or Developer (part 2 in this series)
Installation as a Student or Practitioner
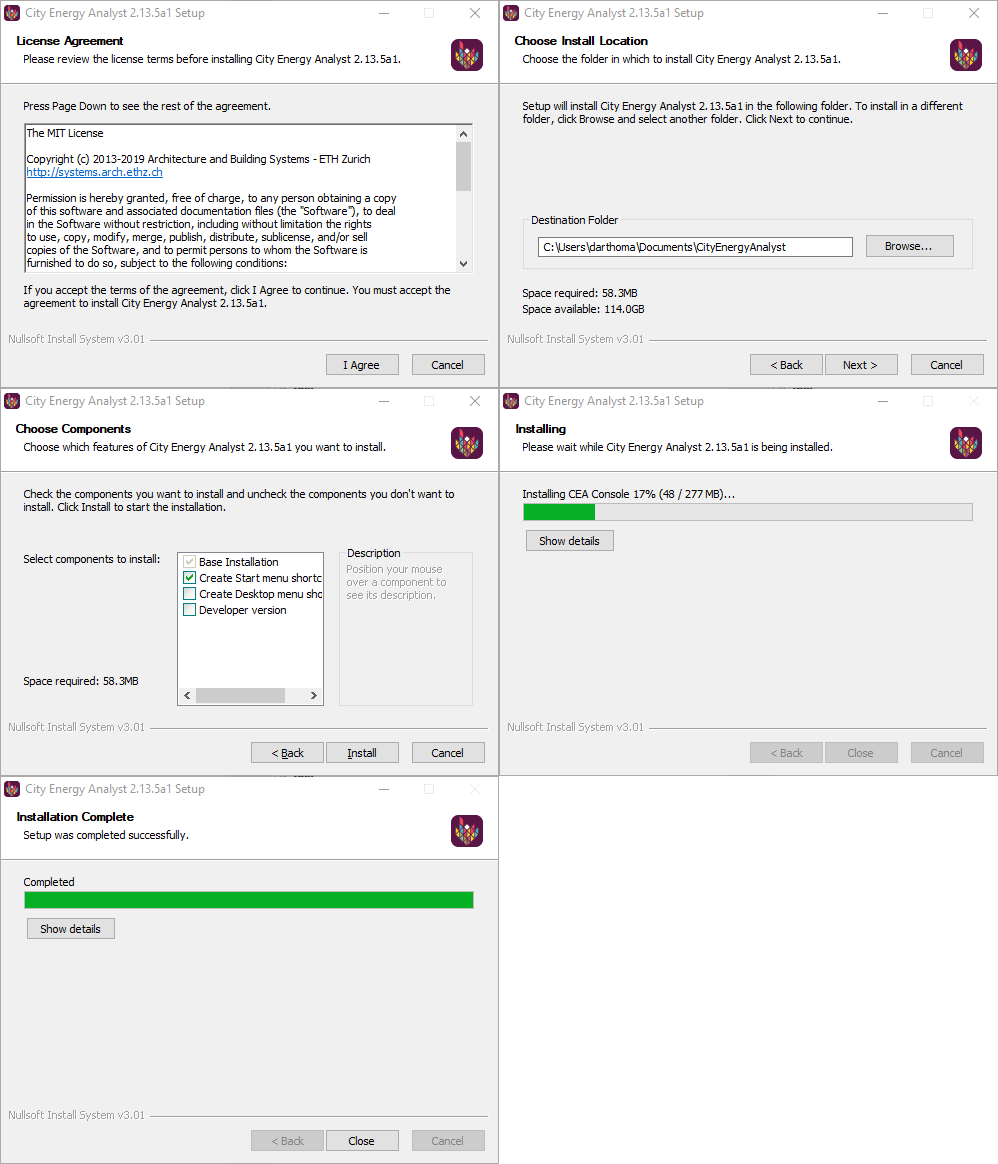
Installation is as simple as running the installer and just accepting all the default options. There. You’re done.

Let’s go through each step in detail:
The CEA is released under the MIT License. You’ll need to agree to the licence terms to continue the installation by clicking on the button labled “I Agree”.
The default setting is to install the CEA in a subfolder of your Documents folder called “CityEnergyAnalyst”. Yes, that’s the special “Documents” folder in the “Quick access” list in Windows Explorer - this will come in handy if you’re doing a Developer style installation (see part 2).
You can change this setting to any folder you like as long as you have write access to that folder. Be aware, though, that in general, the CEA Documentation assumes you installed to the default location.
The main difference between a Student/Practitioner and a Researcher/Developer style installation is the choice of the components. The default setting is to install a “Base Installation” (more on that below) and to “Create Start menu shortcuts”. Additionally, you can choose to “Create Desktop shortcuts”. This will install the same set of shortcuts as those in the Start menu, but on your Desktop.
The installation will take around seven minutes. You can see a detailed view of the current progress by clicking on the button labled “Show details”.
The installer will install the following items:
- A folder called “City Energy Analyst” in your Start menu containing the following shortcuts:
- CEA Dashboard: Launches the CEA Dashboard in your web browser
- CEA Console: Launches the cmder console emulator, preconfigured to run the CEA command line interface (type
cea --helpfor an introduction on the available scripts) - cea.config: Launches
notepad.exewith thecea.configfile - this is a convenience for users who want to edit this file manually
- A folder called “CityEnergyAnalyst” in your Documents folder containing the following items:
- Uninstall.exe: Use this to uninstall the CEA from your computer
- The same list of shortcuts as in the Start menu, for your convenience
- dashboard.bat: A utility file for starting the CEA Dashboard from the shortcut
- Dependencies: This folder contains the minimal Daysim binaries necessary to run the CEA, a Python environment with the CEA dependencies as well as the preconfigured cmder console emulator.
The installer requires an internet connection to locate and download the Python environment.
There. You’re done. Check out the tutorials section of our documentation for further next steps.
See part 2 for information on installing as a Researcher or Developer.